Rotary needles are not just for sewing anymore. With the rise in popularity of handheld rotary tattoo needles, people are now making their tattoo machines. The great thing about this is that you can customize your machine to suit your needs. The bad news? It’s not that easy to make your own. Many people have tried and failed to make a pen tattoo machine. We’ll show you how to make one from scratch.
What You’ll Need
- You’ll need a good-quality electric drill.
- A 3/8” drill bit.
- A 5/32” drill bit.
- A 1/16” drill bit.
- A 1/8” drill bit.
- A hand file.
- A hobby knife.
The Best Pens For Tattooing
For this project, you’ll want to use rotary pens that use a 1/2” or 1” ink cartridge. While you can certainly use a regular ballpoint pen, you’ll want something with more ink flow. Below are a few of our favorite options.
- Coast 2 Coast – One of the most popular and commonly used rotary pens.
- Manga – Affordable and draws really good ink.
- Da Vinci Jr. – A great budget option.
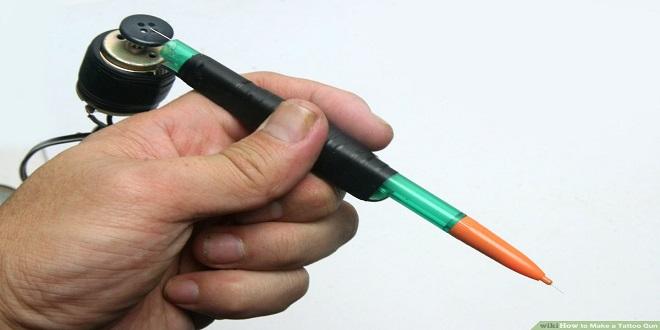
A Rotary Tattoo Machine Explained
A rotary pen tattoo machine is designed to turn a spinning tattoo artist’s ink pen into a tattoo machine. You can use them at home or in a studio, but they are typically operated by a professional artist.
These machines typically have a foot pedal to control the speed and an adjustable arm with a tattoo gun. The machine rotates the arm and gun in one direction while the artist draws with the other hand. The speed and pressure of the gun can be controlled by the artist.
How To Make A Rotary Pen Tattoo Machine
Now that you know what you’ll need, let’s get started. For this project, you’ll need to get your hands on a rotary tattoo machine. If you don’t have one, check out the options above. Next, you’ll need to find a rotary machine that’s broken or doesn’t work. If you don’t have a machine, you can skip this step.
Now, you’ll want to start taking it apart. Start with the base and work your way up. Note – some parts are very delicate and require care. Once you’ve taken it all apart, you’ll want to clean everything well. Put it all in a bowl and cover it with rubber gloves. You don’t want any parts left behind.
Now, you’ll need to decide how you’re going to make your machine. There are a few different ways you can go about it. You can use a plan, improvise, or do some mixing and matching.
For this project, we went with a plan. We drew out the outside of our machine on a piece of paper. From there, we cut the paper to fit in the machine. We marked the spots where the bolts and nuts were. We then took the bolts and nuts out and marked where they were on the inside of the machine. From there, we used a drill to create a hole in the paper where we marked.
Wrapping Up
If you’re looking to make your rotary machine, we have good news. It’s not as hard as you might think. The key is to clean everything well. Put it all in a bowl and cover it with rubber gloves. Now, you’ll want to start taking it apart. This may not be possible if you’re not a mechanical engineer. If that’s the case, you can always hire someone. In most cases, though, it’s pretty straightforward.


1,683 Comments